目录
SBT插件
SBT插件源码地址:https://github.com/dapeng-soa/dapeng-sbt-plugin
sbt-dapeng插件是开源框架dapeng-soa 配套的sbt插件,提供了以下功能:
- 基于thrift文件生成java&scala版本的代码
- 启动dapeng-soa容器测试本地代码
- 基于数据库结构生成对应的scala实体
- 生成基于dapeng-soa框架的docker服务镜像
sbt-dapeng需求的配置:
- 确保java 的版本为 1.8
- 确保scala的版本为 2.12.2 或以上
- 确保sbt 的版本为 1.0.0 或以上 (推荐使用1.1.6)
我们通过一个简单的项目来了解如何使用sbt-dapeng插件的功能:
1 使用dapeng提供的g8模板创建一个简单的hello项目 (也可以自己创建一个sbt项目,此处为了方便,直接使用g8模板)
> cd your_work_space
> sbt new dapeng-soa/dapeng-soa-v2.g8 (执行该指令会出现交互界面,输入对应信息完成项目模板的创建)

this is a template to genreate dapeng api service

name [hello]: hello                         # your Project Name
version [0.1-SNAPSHOT]:                     # your Project Version
scalaVersion [2.12.2]:                      # your Scala Version
organization [com.github.dapeng]:           # your project GroupId
resources [resources]:                      # defaultValue, no need to modify
api [hello-api]:                            # defaultTemplateValue, no need to modify
service [hello-service]:                    # defaultTemplateValue, no need to modify
java [java]:                                # defaultTemplateValue, no need to modify
scala [scala]:                              # defaultTemplateValue, no need to modify
docker [docker]:                            # defaultTemplateValue, no need to modify
servicePackage [com.github.dapeng]:         # default project root package, you can specific it by your own
dapengVersion [2.0.4]: 2.0.5                # default dapeng-soa version. current is 2.0.5

Template applied in ./hello
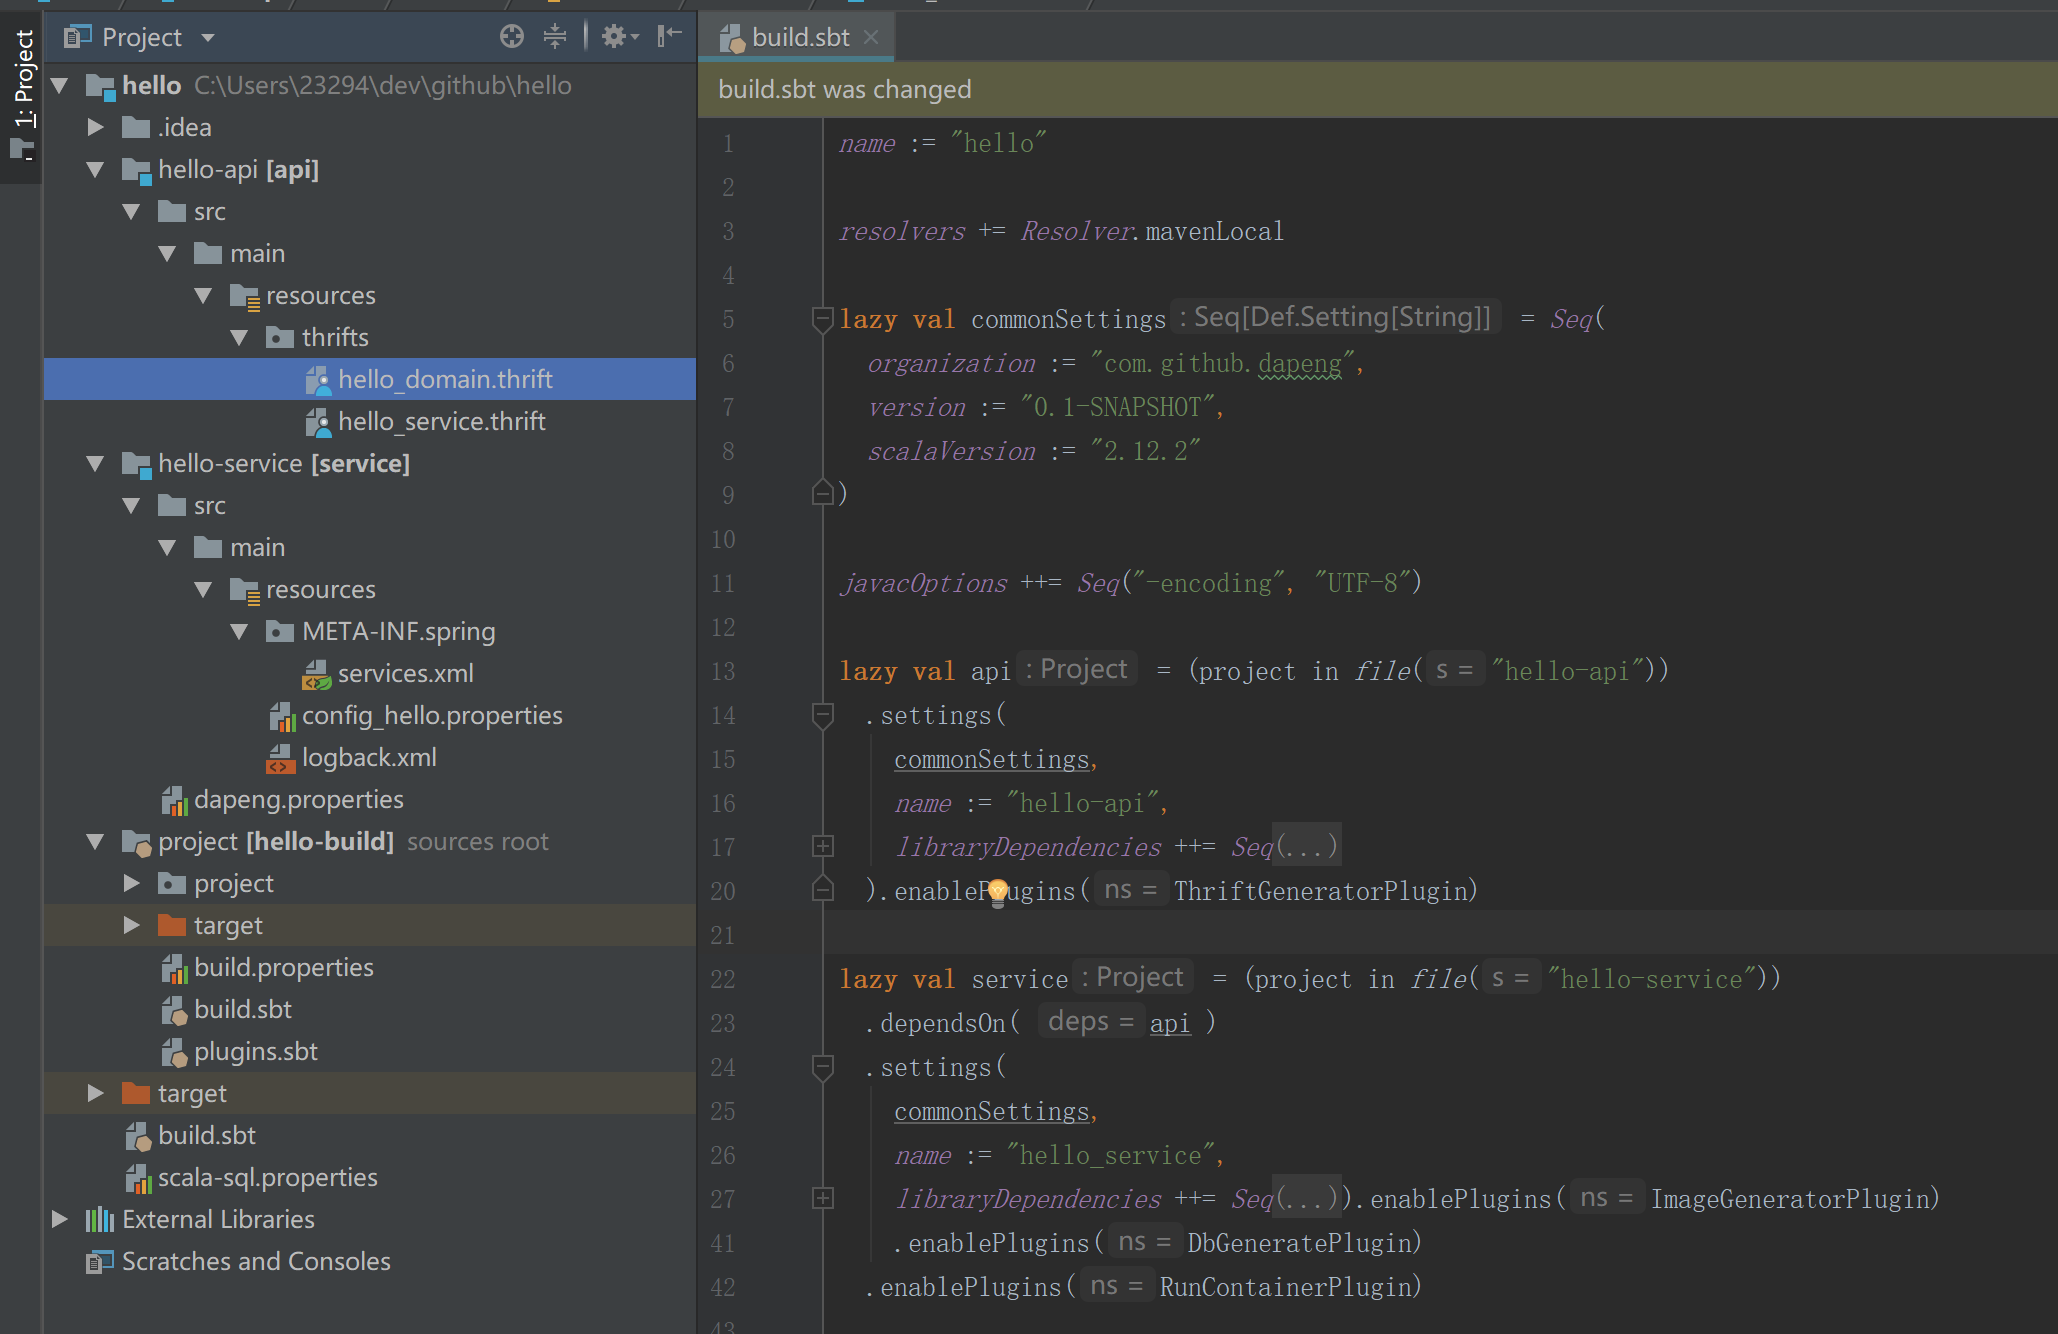
至此我们就完成了项目的创建, 下面我们来看一下项目结构:

- 左边框是g8模板生成的项目目录
g8模板项目把hello项目分成了hell-api, hello-service两个项目, 这是为了服务能够做到接口与实现的隔离,其他项目只需依赖api包即可. - 目前有两个文件是我们需要关注的
2.1plugins.sbt我们需要配置该文件让sbt-dapeng插件生效//添加sbt-dapeng插件 addSbtPlugin("com.github.dapeng" % "sbt-dapeng" % "2.0.5") //该插件是optional的,可以执行 `sbt dependencies` 分析项目的依赖树 addSbtPlugin("net.virtual-void" % "sbt-dependency-graph" % "0.9.0")2.2
build.sbtname := "hello" resolvers += Resolver.mavenLocal lazy val commonSettings = Seq( organization := "com.github.dapeng", version := "0.1-SNAPSHOT", scalaVersion := "2.12.2" ) javacOptions ++= Seq("-encoding", "UTF-8") lazy val api = (project in file("hello-api")) .settings( commonSettings, name := "hello-api", libraryDependencies ++= Seq( "com.github.dapeng" % "dapeng-client-netty" % "2.0.5" ) ).enablePlugins(ThriftGeneratorPlugin) //注1 lazy val service = (project in file("hello-service")) .dependsOn( api ) .settings( commonSettings, name := "hello_service", libraryDependencies ++= Seq( "com.github.dapeng" % "dapeng-spring" % "2.0.5", "com.github.wangzaixiang" %% "scala-sql" % "2.0.6", "org.slf4j" % "slf4j-api" % "1.7.13", "ch.qos.logback" % "logback-classic" % "1.1.3", "ch.qos.logback" % "logback-core" % "1.1.3", "org.codehaus.janino" % "janino" % "2.7.8", "mysql" % "mysql-connector-java" % "5.1.36", "com.alibaba" % "druid" % "1.1.9", "org.springframework" % "spring-context" % "4.3.5.RELEASE", "org.springframework" % "spring-tx" % "4.3.5.RELEASE", "org.springframework" % "spring-jdbc" % "4.3.5.RELEASE", "com.github.dapeng" % "dapeng-client-netty" % "2.0.5" )).enablePlugins(ImageGeneratorPlugin) //注2 .enablePlugins(DbGeneratePlugin) //注3 .enablePlugins(RunContainerPlugin) //注4注1:enablePlugins(ThriftGeneratorPlugin): 启用sbt-dapeng插件基于thrift idl生成java&scala代码的功能
注2: enablePlugins(ImageGeneratorPlugin): 启用sbt-dapeng插件提供的生成项目docker镜像的功能
注3: enablePlugins(DbGeneratePlugin): 启用sbt-dapeng插件提供的基于数据库结构生成对应scala实体的功能
注4: enablePlugins(RunContainerPlugin): 启用sbt-dapeng插件 本地部署hello项目的功能
2 使用sbt-dapeng插件编译 hello 项目生成api源码
ThriftGeneratorPlugin 在sbt compile期执行, 即执行compile会执行该插件生成对应的api文件
> sbt api/compile
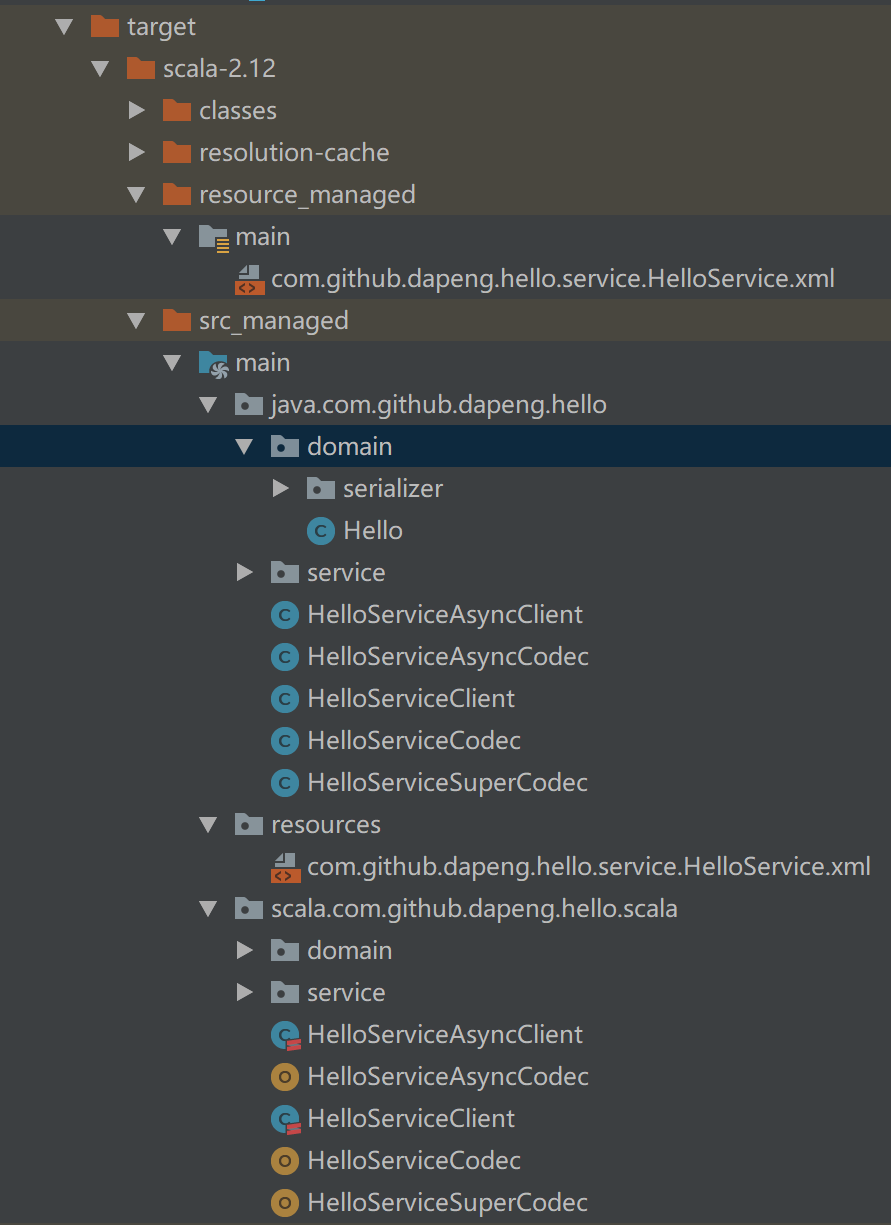
执行完该指令,则会直接在hello-api/target目录下生成对应的api文件,如下图: (要了解图中每个文件的作用,请参阅idl_详析章节)

3 使用sbt-dapeng插件 ~runContainer 指令启动 hello服务
要启动hello服务,首先我们需要实现一下helloService接口,并配置好SpringBean
1.实现HelloService scala版本接口 (如果你感兴趣也可以自己实现java版的接口)
HelloServiceImpl
package com.github.dapeng.hello

import com.github.dapeng.hello.scala.domain.Hello
import com.github.dapeng.hello.scala.service.HelloService

class HelloServiceImpl extends HelloService {
  /**
    *
    **/
  override def sayHello(hello: Hello): String = {
    s"${hello.name} ${hello.message}"
  }
}
2.配置SpringBean
services.xml
<?xml version="1.0" encoding="UTF-8"?>
<beans xmlns="http://www.springframework.org/schema/beans"
       xmlns:xsi="http://www.w3.org/2001/XMLSchema-instance"
       xmlns:soa="http://soa-springtag.dapeng.com/schema/service"
       xmlns:context="http://www.springframework.org/schema/context"
       xsi:schemaLocation="http://www.springframework.org/schema/beans
        http://www.springframework.org/schema/beans/spring-beans.xsd
        http://soa-springtag.dapeng.com/schema/service
        http://soa-springtag.dapeng.com/schema/service/service.xsd
        http://www.springframework.org/schema/context
        http://www.springframework.org/schema/context/spring-context.xsd">

    <!--参数配置, 本例中暂时没用,可以忽略-->
    <context:property-placeholder location="classpath:config_hello.properties" local-override="false"
                                  system-properties-mode="ENVIRONMENT"/>

    <context:component-scan base-package="com.github.dapeng"/>

    <!-- 注册 HelloService, 使用 soa:service 标签声明helloService为dapeng框架的bean -->
    <bean id="helloScalaService" class="com.github.dapeng.hello.HelloServiceImpl"/>
    <soa:service ref="helloScalaService"/>
</beans>
3.启动HelloService服务
> sbt  //执行sbt命令进入 sbt console
sbt:hello> ~runContainer   //执行~runContainer

......
信息: FrameworkServlet 'appServlet': initialization started
九月 12, 2018 9:25:08 上午 org.springframework.web.context.support.XmlWebApplicationContext prepareRefresh
信息: Refreshing WebApplicationContext for namespace 'appServlet-servlet': startup date [Wed Sep 12 09:25:08 CST 2018]; parent: Root WebApplicationContext
九月 12, 2018 9:25:08 上午 org.springframework.web.servlet.DispatcherServlet initServletBean
信息: FrameworkServlet 'appServlet': initialization completed in 12 ms
api-doc server started at port: 8192
1. 使用
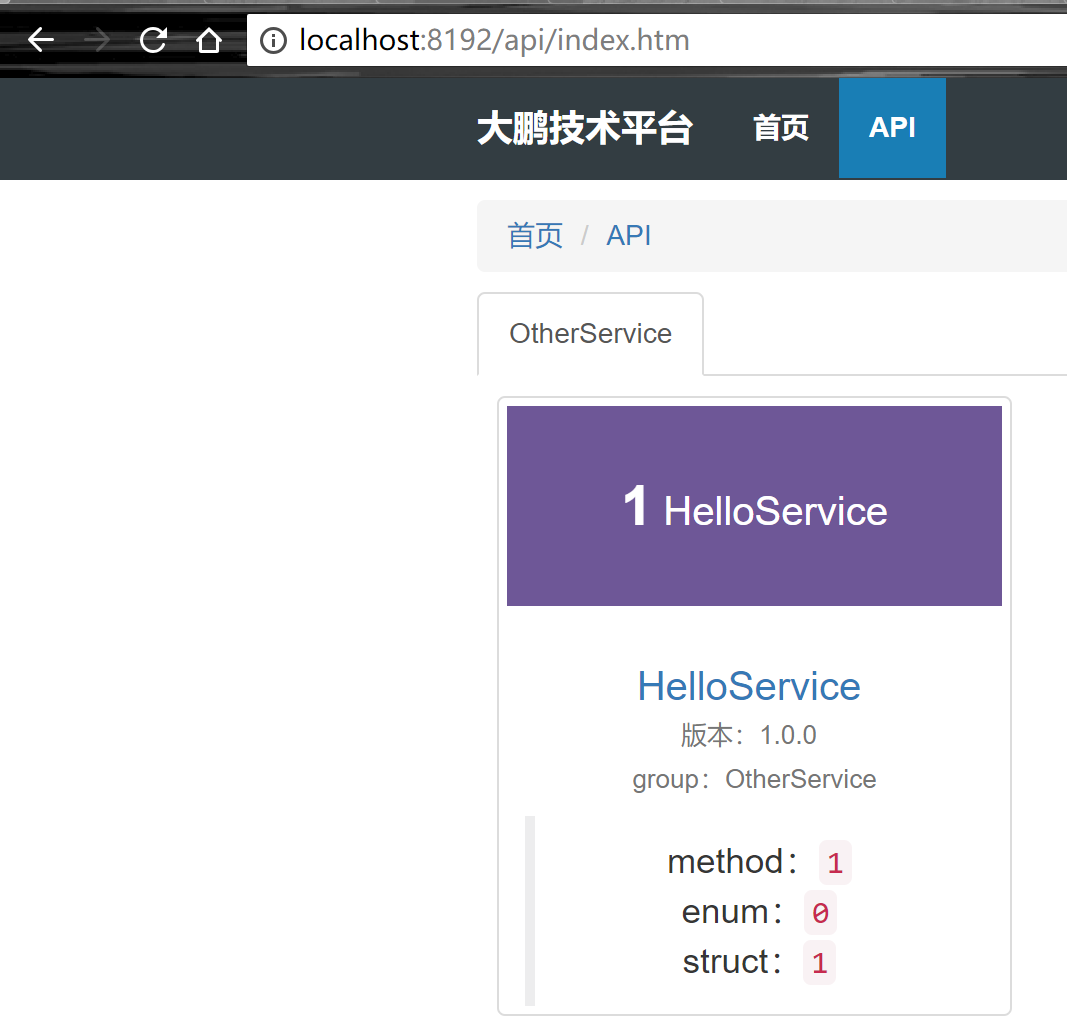
~runContainer命令在增量开发模式下启动服务,在之后的开发中,你只需要关心代码,而服务的编译和启动交给dapeng-sbt帮你完成。最后你会看到api-doc 站点已启动,且端口是8192, 我们在浏览器打开localhost:8192, 你可以看到下图所示:

2. 点击Api标签,可以看到启动的HelloService服务, 说明服务已经启动成功

关于文档站点的更多细节,我们会在 下一小节详细讲解
4 使用sbt-dapeng插件生成数据库结构实体
1.首先我们先创建数据库叫 hello_db, 并创建表Hello
注: 例子中的mysql ip: 127.0.0.1, port: 3306
create database hello_db;

use hello_db;
create table hello(
	name varchar(64) not null default '' comment 'Hello name',
    message varchar(512) default null comment 'hello message'
);
2.在 hello-service/dapeng.properties 配置数据库链接信息
plugin.db.url=jdbc:mysql://127.0.0.1:3306/hello_db?useUnicode=true&characterEncoding=utf8
plugin.db.user=yourAccount
plugin.db.password=yourPasswd
plugin.db.name=hello_db
3.生成数据库实体
- 默认生成的包名为:
com.github.dapeng.soa.scala.dbName.entity - 默认生成的枚举包名为:
com.github.dapeng.soa.scala.enum - 如果满足格式:
Comment,EnumIndex:Chars(EnglishChars);enumIndex:Chars(EnglishChars);即认为是枚举类型字段。 如: 账户类型,1:资金账户(CAPITAL);2:贷款账号(CREDIT);3:预付账户(PREPAY);
生成数据库实体支持以下几种格式:
 //1. 不指定包名,表名,直接生成dapeng.properties配置的数据库的所有表结构实体
 > dbGenerate

 //2. 指定包名,不指定表名,生成指定包名的所有表结构实体
 > dbGenerate com.github.dapeng.hello

 //3. 指定包名,表名, 生成结构实体
 > dbGenerate com.github.dapeng.hello Hello
例子如下: 以默认方式为例; 其他方式可以自行尝试
 sbt: hello> dbGenerate

 ......
 start to generated db entity....args:
db: hello_db, packageName: com.github.dapeng.soa.scala, tableName:
connectTo, url: jdbc:mysql://127.0.0.1:3306/hello_db?useUnicode=true&characterEncoding=utf8, user: root, passwd: today-36524
 No specific tableName found. will generate hello_db all tables..
 start to generated hello_db.Hello entity file...
generating file: C:\Users\23294\dev\github\hello\hello-service/src/main/scala/com/github/dapeng/soa/scala/entity/ / Hello.scala: true
[success] Total time: 0 s, completed 2018-9-12 16:29:27
sbt:hello>
生成的
Hello代码
 package com.github.dapeng.soa.scala.entity

 import wangzx.scala_commons.sql.ResultSetMapper

 case class Hello(
                  /** Hello name */
                  name: String,

                  /** hello message */
                  message: Option[String], //由于message 字段是default null, 所以生成的类型是Option
                )

object Hello {
  implicit val resultSetMapper: ResultSetMapper[Hello] = ResultSetMapper.material[Hello]
}
#### 5 使用sbt-dapeng 生成镜像
 sbt hello> docker

 ......
 [info] Done packaging.
[info] Sending build context to Docker daemon  24.03MB
[info] Step 1/7 : FROM dapengsoa/dapeng-container:2.0.5
[info] 2.0.5: Pulling from dapengsoa/dapeng-container
[info] 8e3ba11ec2a2: Already exists
[info] 585040a010b7: Already exists
[info] a09777f4e9ae: Already exists
[info] 2dcaf9adfe5d: Already exists
[info] ebed03a668c3: Already exists
[info] 0ec1452d8435: Already exists
[info] 3c75003452ef: Already exists
[info] 849a3ef2d81f: Already exists
[info] f768398b0bfd: Already exists
[info] 9b682b742498: Already exists
[info] e6f80bd11609: Already exists
[info] 485cde770283: Already exists
[info] 28e7c0ee86ca: Already exists
[info] c1d7b6c300ab: Pulling fs layer
[info] 32f6da74dac9: Pulling fs layer
[info] 1fe87dd9d2c2: Pulling fs layer
[info] fc9350788785: Pulling fs layer
[info] c142582859c0: Pulling fs layer
[info] fc9350788785: Waiting
[info] c142582859c0: Waiting
[info] 32f6da74dac9: Verifying Checksum
[info] 32f6da74dac9: Download complete
[info] 1fe87dd9d2c2: Download complete
[info] c142582859c0: Verifying Checksum
[info] c142582859c0: Download complete
[info] c1d7b6c300ab: Verifying Checksum
[info] c1d7b6c300ab: Download complete
[info] c1d7b6c300ab: Pull complete
[info] 32f6da74dac9: Pull complete
[info] 1fe87dd9d2c2: Pull complete
[info] fc9350788785: Verifying Checksum
[info] fc9350788785: Download complete
[info] fc9350788785: Pull complete
[info] c142582859c0: Pull complete
[info] Digest: sha256:43365e918065c2602a7149e62d78aa1d6ba4651daacd59d41ca86b9313fccc40
[info] Status: Downloaded newer image for dapengsoa/dapeng-container:2.0.5
[info]  ---> d8cd7800d239
[info] Step 2/7 : RUN ["mkdir", "-p", "\/dapeng-container"]
[info]  ---> Running in 1b61955c2380
[info] Removing intermediate container 1b61955c2380
[info]  ---> e7fb62e7d59f
[info] Step 3/7 : RUN ["mkdir", "-p", "\/apps\/hello_service"]
[info]  ---> Running in 59b02b1124dd
[info] Removing intermediate container 59b02b1124dd
[info]  ---> beab9c1edaaf
[info] Step 4/7 : RUN ["chmod", "+x", "\/dapeng-container\/bin\/startup.sh"]
[info]  ---> Running in fdc841c7aa6c
[info] Removing intermediate container fdc841c7aa6c
[info]  ---> d74d396fb21c
[info] Step 5/7 : WORKDIR /dapeng-container/bin
[info]  ---> Running in 6c613ec25e6b
[info] Removing intermediate container 6c613ec25e6b
[info]  ---> d540746cd5ba
[info] Step 6/7 : COPY 0/hello_service_2.12-0.1-SNAPSHOT.jar 1/hello-api_2.12-0.1-SNAPSHOT.jar 2/scala-library-2.12.2.jar 3/dapeng-client-netty-2.0.5.jar 4/dapeng-utils-2.0.5.jar 5/netty-all-4.1.20.Final.jar 6/dapeng-core-2.0.5.jar 7/dapeng-registry-zookeeper-2.0.5.jar 8/zookeeper-3.4.7.jar 9/slf4j-api-1.7.13.jar 10/jline-0.9.94.jar 11/logback-classic-1.1.3.jar 12/logback-core-1.1.3.jar 13/dapeng-router-2.0.5.jar 14/dapeng-container-api-2.0.5.jar 15/spring-context-4.3.5.RELEASE.jar 16/spring-aop-4.3.5.RELEASE.jar 17/spring-beans-4.3.5.RELEASE.jar 18/spring-core-4.3.5.RELEASE.jar 19/commons-logging-1.2.jar 20/spring-expression-4.3.5.RELEASE.jar 21/dapeng-json-2.0.5.jar 22/janino-2.7.8.jar 23/commons-compiler-2.7.8.jar 24/dapeng-spring-2.0.5.jar 25/commons-lang3-3.1.jar 26/scala-sql_2.12-2.0.6.jar 27/scala-reflect-2.12.2.jar 28/mysql-connector-java-5.1.36.jar 29/druid-1.1.9.jar 30/spring-tx-4.3.5.RELEASE.jar 31/spring-jdbc-4.3.5.RELEASE.jar /dapeng-container/apps/hello_service/
[info]  ---> 693a54de0878
[info] Step 7/7 : ENTRYPOINT ["\/dapeng-container\/bin\/startup.sh"]
[info]  ---> Running in 51fea8f33704
[info] Removing intermediate container 51fea8f33704
[info]  ---> 024b6363c41d
[info] Successfully built 024b6363c41d
[info] SECURITY WARNING: You are building a Docker image from Windows against a non-Windows Docker host. All files and directories added to build context will have '-rwxr-xr-x' permissions. It is recommended to double check and reset permissions for sensitive files and directories.
[info] Tagging image 024b6363c41d with name: dapengsoa/biz/hello_service:latest
[success] Total time: 27 s, completed 2018-9-13 13:40:23

Process finished with exit code 0
如上日志所示, dapengsoa/biz/hello_service:latest 就是生成基于dapeng-soa框架的镜像
Ps: 如果是git 项目,镜像的tag取的是gitId的前7位, 默认是latest